Change Photo Aspect Ratio with AI Outpainting
Your photo has the wrong format – and cropping only makes things worse
You’ve taken a perfect vertical shot. But for your newsletter, you need a landscape banner. Or vice versa – you have a beautiful horizontal photo, but Instagram Stories requires 9:16.
And the result of cropping? A perfectly composed photo turns into a mere cutout, missing half the scene.
Photo format is one of the most annoying technical issues when creating content. You can’t re-shoot every single image just to fit a different aspect ratio.
The wrong format blocks the entire visual – and the options are worse than they seem
The situation is much more common than you think. And every solution without AI involves a compromise that is visible in the result:
Cropping removes part of the scene, cuts through objects, and unnecessarily destroys the composition you worked so hard on.
Empty bars on the sides look amateurish and sabotage reach on social media – algorithms prefer content that correctly fills the format.
Blurring the edges (a popular feature in mobile apps) is quick, but the result never looks like an original photo.
Re-shooting or re-generating costs time that you simply don’t have for every variation.
Typical situations where it hurts the most:
- You take a photo on your phone in vertical format – and then you need it as a LinkedIn banner
- An AI generator creates a square image – you need 16:9 for a presentation
- You have a great shot of food for an Instagram feed – but the Story format requires 9:16
- A client approves a product photo and only then mentions they need it for five different platforms
No more white bars on social media
Do you know that feeling when you're looking for how to resize a photo for Instagram so that the whole thing fits into a square, and the app creates ugly white or blurry bars on the sides? With the advent of AI outpainting (often referred to as generative fill), you can finally resize a photo without cropping and without these distracting bars. The algorithm simply generates the missing real-world content.
AI outpainting: A step-by-step guide
AI image editor GuideGlare doesn’t pixelate edges or add empty space. It analyzes the content of the photo – light, textures, perspective, scene context – and naturally generates content beyond the original boundaries of the image.
The result looks as if you had taken the photo from the start in the desired format.
GuideGlare offers two tools for working with format:
Tool 1: Expand Image – extending content beyond the edges
This tool expands the content of the image itself – AI intelligently guesses what would logically be beyond the photo’s boundary.
✅ Ideal for:
- Adding space around an object without cropping
- Gaining free space for text or graphic elements
- Preserving the entire composition when changing format
Available expansion options:
- Zoom out 1.5× – slight expansion on all sides
- Zoom out 2× – more significant expansion, double the space around the object
- Make square – automatic expansion to a square without cropping
How to do it:
Step 1: Upload your photo to GuideGlare AI editor
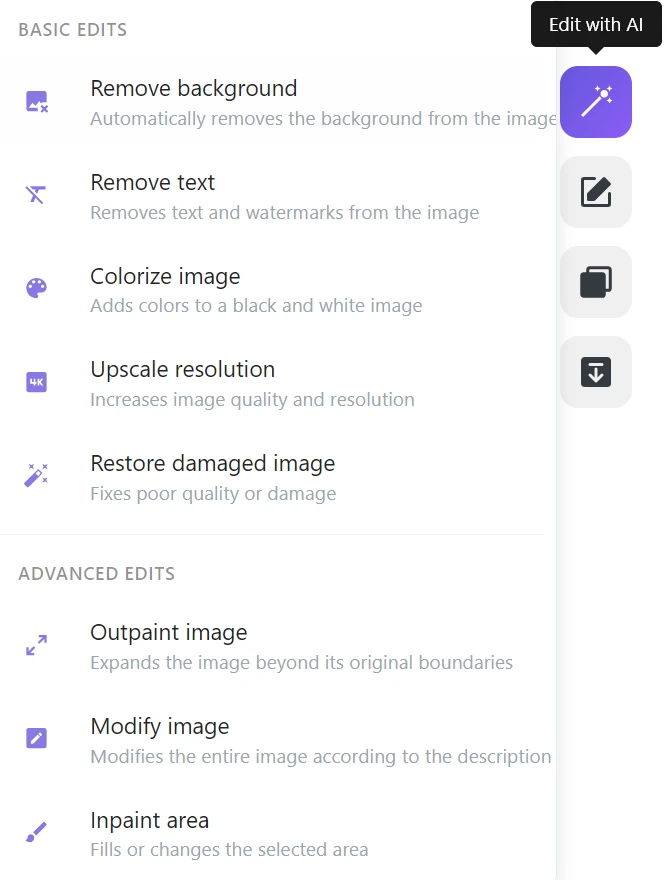
Step 2: Click on “Edit with AI” → “Expand Image”
Step 3: Choose the expansion type and describe the scene
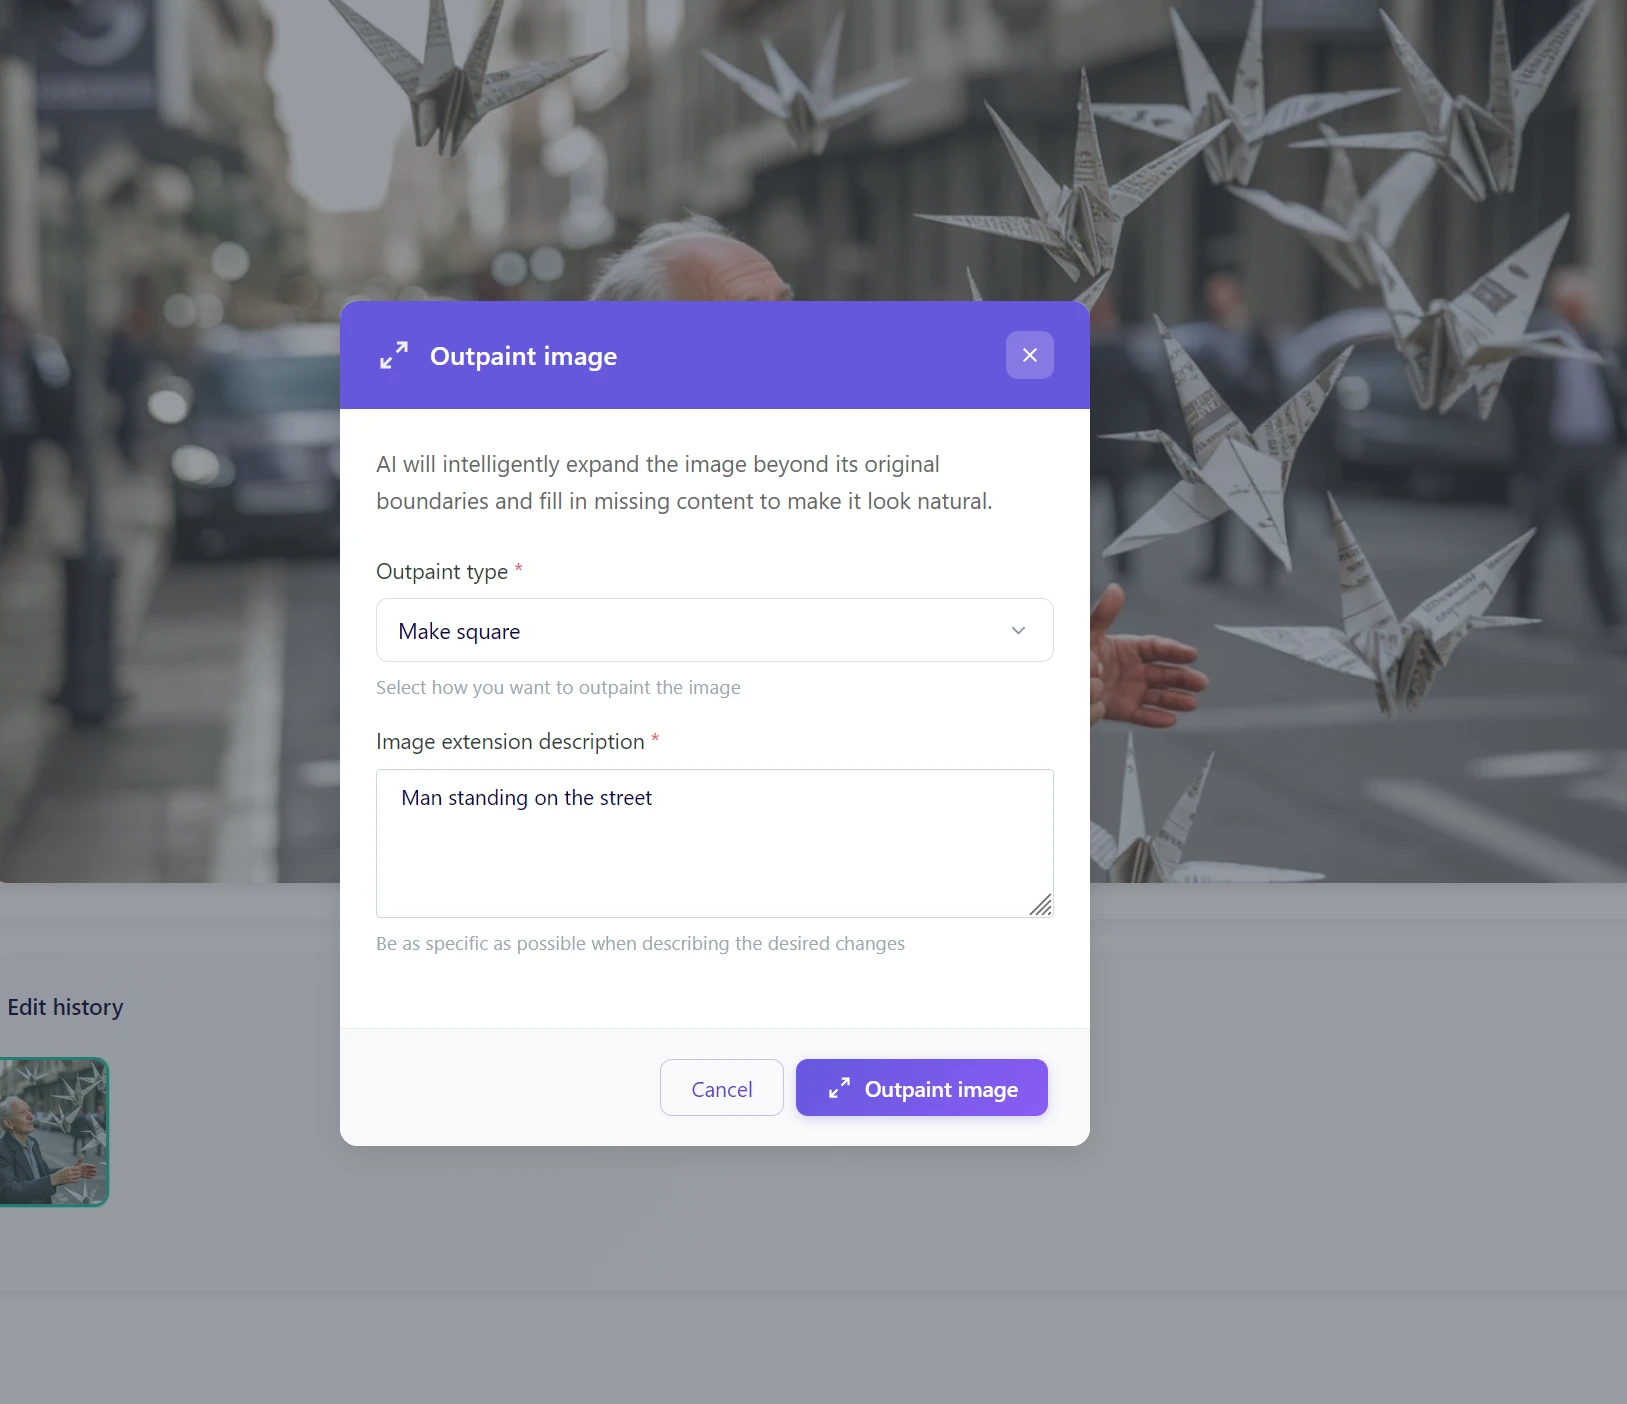
In the instruction field for expanding the image, write a brief context. A few keywords are enough:
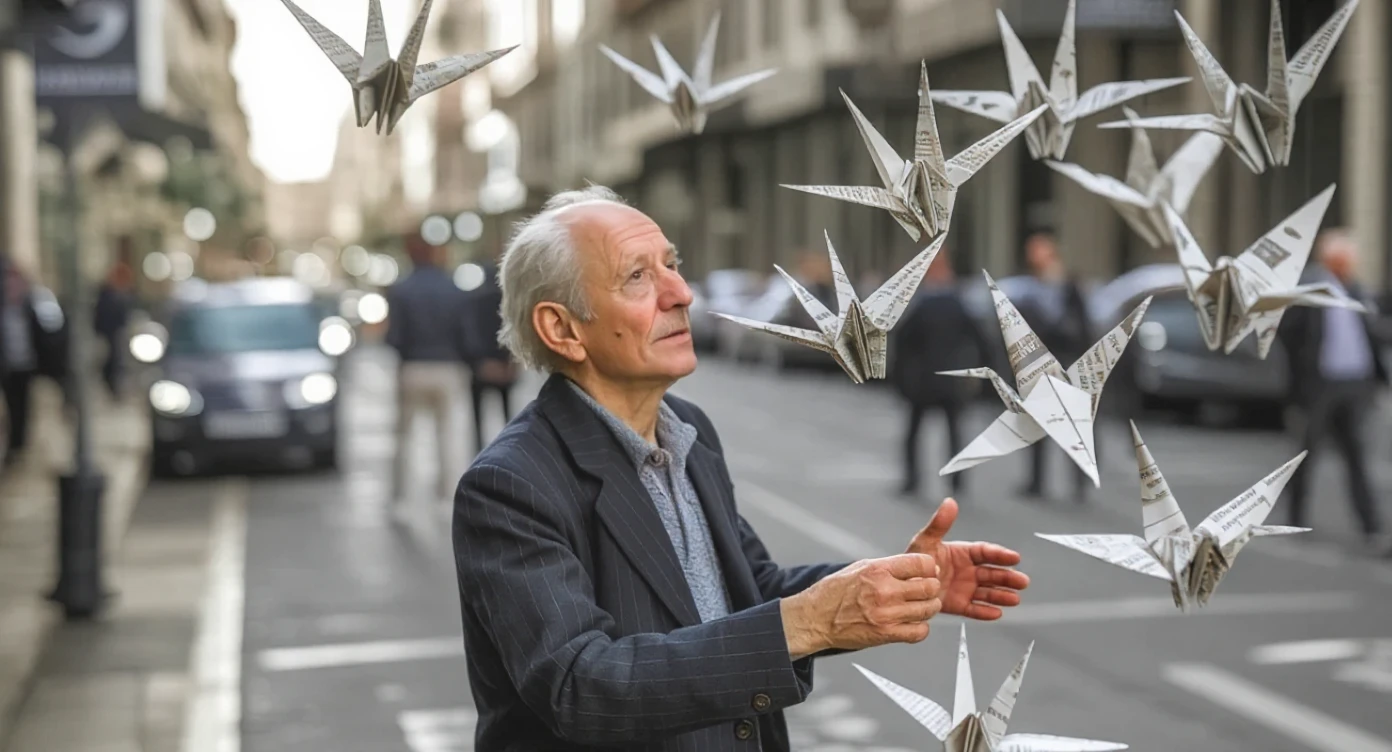
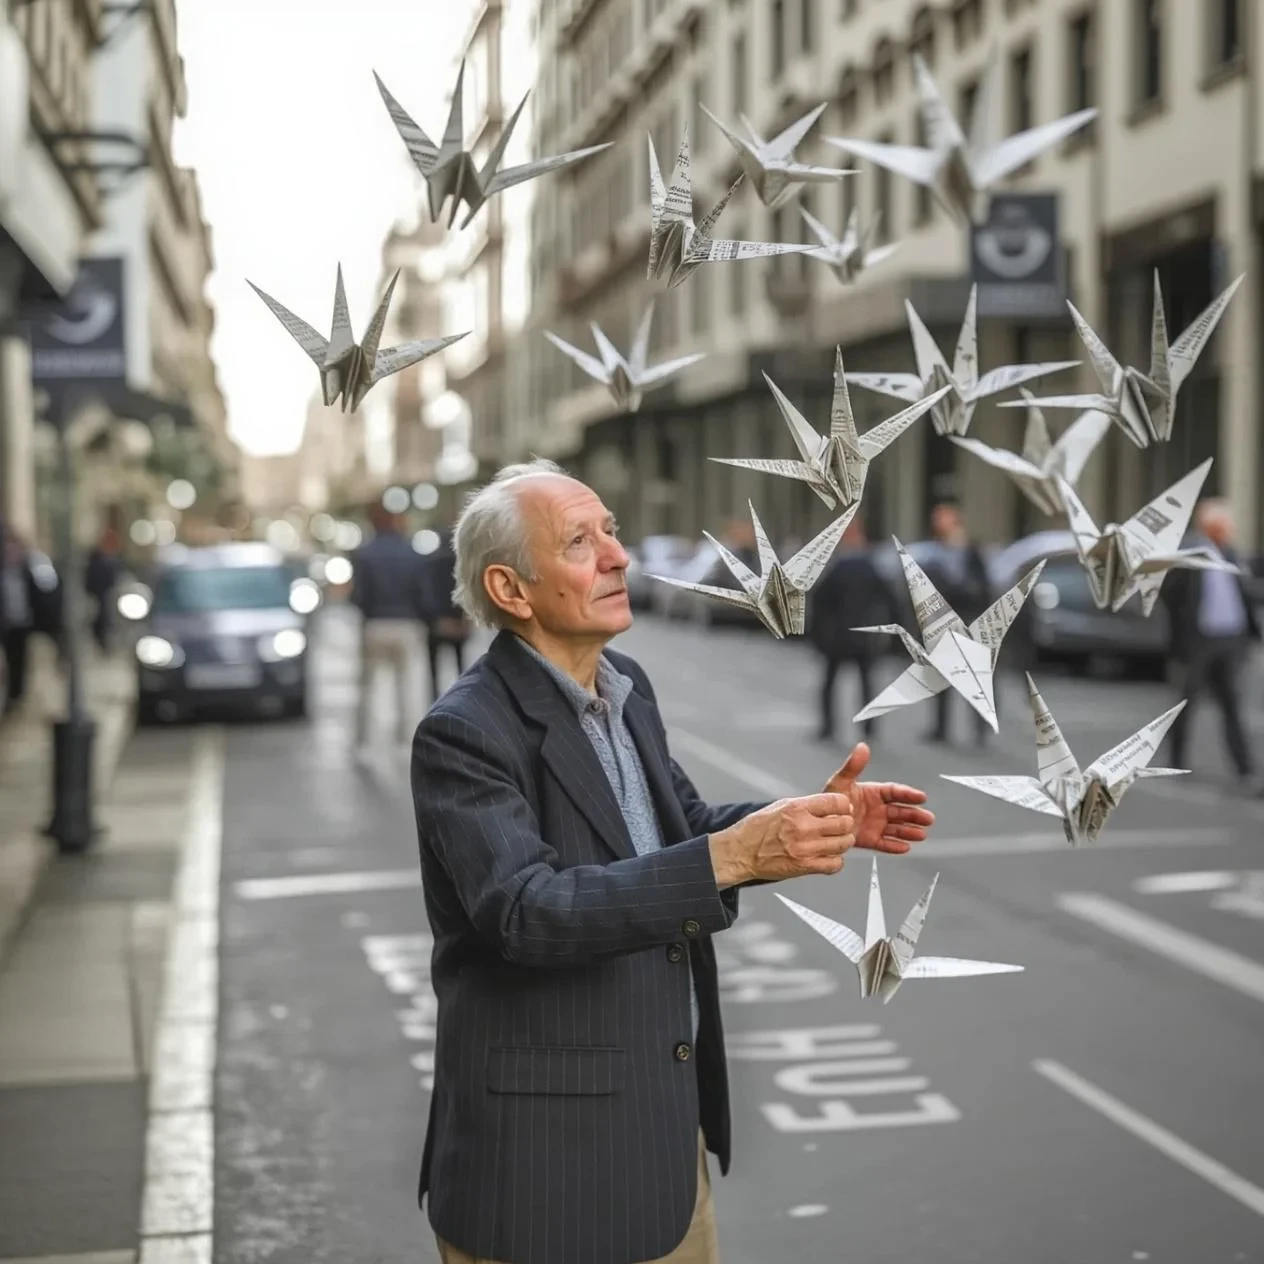
- “Man standing on a street”
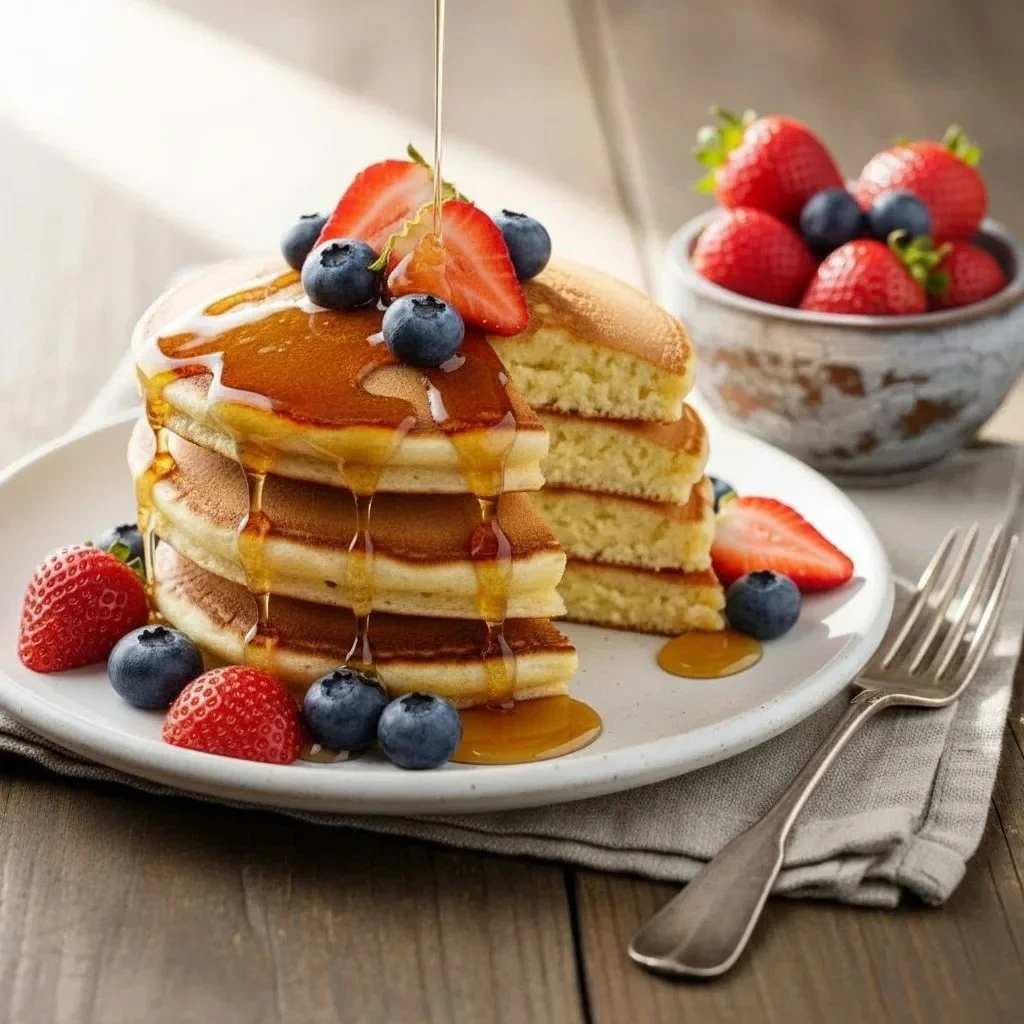
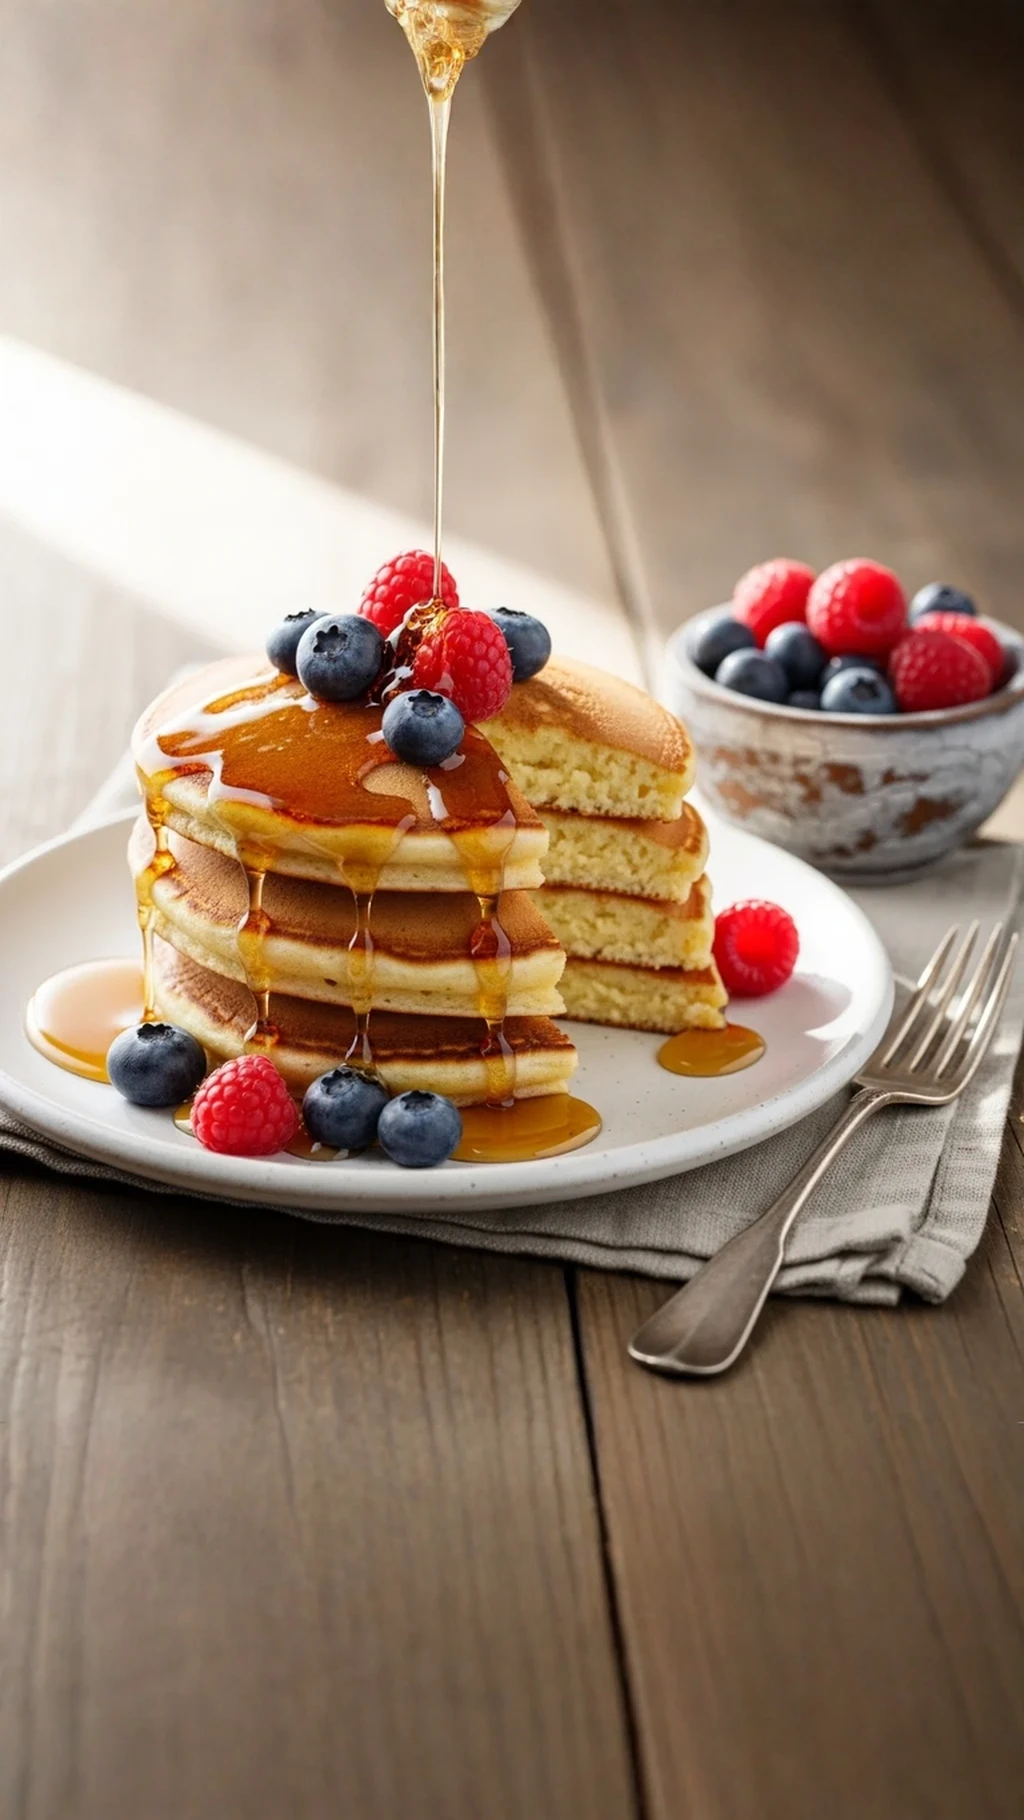
- “Pancakes on a wooden table”
- “Product on a white background”
Step 4: Click “Expand Image” and wait 15–30 seconds
Create space for text (negative space)
When using AI outpainting for marketing, the prompt is your steering wheel. For perfect background expansion into a banner, don't just describe what is already in the photo, but also what you want to be created. Do you need empty space next to the product for a headline? Write: "Product on a wide empty wooden table with soft studio lighting". This photo completion will create the ideal space for inserting advertising text or a logo.
Tool 2: Change image aspect ratio
If you need a specific aspect ratio for a given platform or format, this tool will adapt the photo precisely – AI will automatically expand or adjust the edges.
✅ Ideal for:
- Preparing one photo for multiple platforms at once
- Precise formats for social media, print, or web
- Situations where you need a specific aspect ratio, not just “a little more space”
Available aspect ratios: 1:1 (square) · 16:9 (widescreen) · 9:16 (Stories) · 3:2 (photo) · 2:3 (portrait) · 4:5 (Instagram) · 5:4 · 4:3 (monitor) · 3:4
How to do it:
Step 1: In the AI photo editor menu, click “Edit with AI” → “Change Aspect Ratio”
Step 2: Choose the target aspect ratio from the list
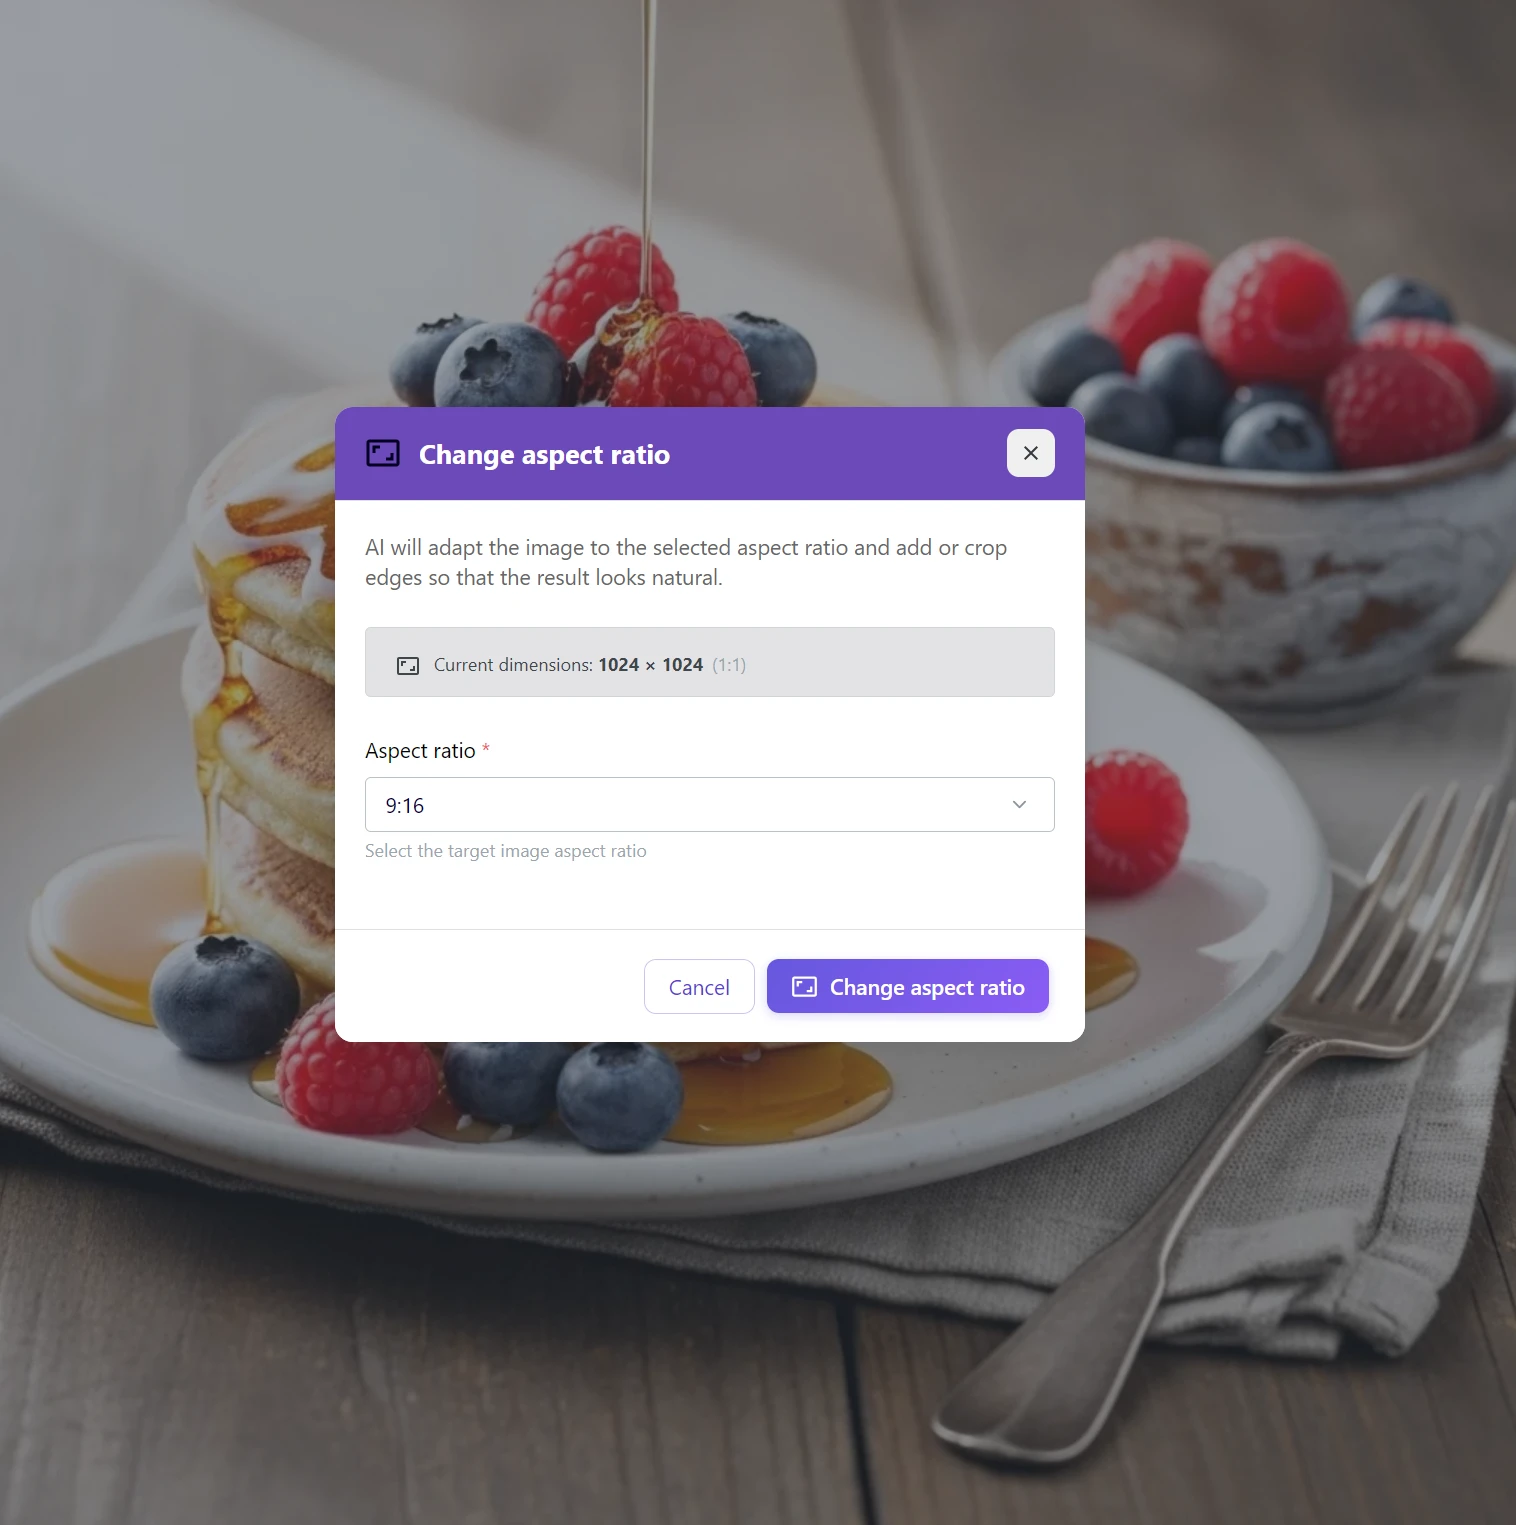
Step 3: Click “Change” – AI will adapt the image and naturally fill in the missing parts
When to use which tool?
| Expand Image | Change Aspect Ratio |
|---|---|
| You want to add space around an object | You need a precise format for a platform |
| Zoom out – preserve the entire scene | Instagram, Stories, LinkedIn banner |
| Free space for text in graphics | Precise custom aspect ratio |
| You control the degree of expansion (1.5×, 2×) | AI determines how much to expand itself |
Golden rule: Do you just need “more space”? → Expand Image. Do you know exactly what format you want? → Change Aspect Ratio.
Where AI outpainting is most useful
Social media and different formats at once
One photo, five platforms, five different aspect ratios. Instead of five different shots, one is enough, and AI will adapt it to each format – without repeated shooting or generation.
Food photography and product photos
A great shot of food or a product in a square photo – and you need vertical Stories or a horizontal banner. Outpainting will naturally fill in the table, background, or scene context, without a visible transition.
Graphics and marketing materials
Do you need free space around an object for text, a logo, or graphic elements? Zoom out will create space without cropping content – and you can fill it with exactly what you want.
AI-generated images
The generator created a square image, but you need widescreen for a presentation. Outpainting will extend the scene exactly where the generator’s imagination ended. For print quality, you can then upscale the result to 4K.
Start expanding your photos to the correct format today
The photo format doesn’t have to be your limitation. With AI photo editing in GuideGlare, you can adapt any image to any format – without cropping, without empty space, without compromises in composition.
One image, all formats. No compromises.
Change a vertical photo into a horizontal banner. Prepare a square image for Stories. AI intelligently fills in the background, and you get the perfect visual for every platform. Without cropping, without empty bars.
Tools for changing format are available starting from the Basic plan.
Frequently asked questions
Is AI outpainting free?
To use advanced AI tools in GuideGlare, such as outpainting (image expansion), an active subscription, for example, the Basic plan, is required. The reason is that, unlike simple tools that would just add a colored bar or blur the edges, our AI actually generates new content. This process is computationally intensive and requires advanced AI models.
So you pay for technology that can naturally “imagine” the world beyond the boundaries of your photo – and save you hours of work with uncertain results.
How precise does the scene description need to be for the “Expand Image” tool?
The description doesn’t have to be long, but it should be concise. Its purpose is to give the AI basic context so it knows what environment to continue in. Instead of complex sentences, a few keywords describing the scene are sufficient.
Examples of good descriptions:
- “Man standing on a busy city street”
- “Detail of pancakes on a wooden table, morning light”
- “White product on a clean white background in a studio”
Practical tip: If you don’t fill in the description, the AI will try to estimate the scene from the image itself, but with your description, you will achieve better and more consistent results.
What aspect ratios are available in the “Change Aspect Ratio” tool?
The tool covers all key formats for digital marketing and social media:
- 1:1 (square) – Ideal for Instagram feed, profile pictures.
- 16:9 (widescreen) – For YouTube thumbnails, web banners, presentations.
- 9:16 (vertical) – For Instagram Stories, Reels, TikTok.
- 4:5 (taller portrait) – A popular format for Instagram posts.
- Other standards: 3:2, 2:3, 4:3 and more.
This allows you to take a single photo and prepare it for all platforms at once without the need for cropping.
Can you tell where the original photo ends and the AI addition begins?
In most cases, no. Artificial intelligence analyzes the key elements of the original image – the direction of light, shadows, material textures, photo grain, and perspective – and tries to continue them seamlessly.
The result is best for photos with a clear background (sky, wall, nature). In very complex and chaotic scenes, the transition may be slightly noticeable, but even so, the result will look much better than cropping or colored bars.
Can I combine outpainting with other edits?
Yes, and it is even the recommended approach for achieving the best results. A practical workflow looks like this:
- First, expand the image to the desired format using outpainting.
- If the AI generated a distracting element in the expanded part, remove it with the “Edit Image” tool.
- Finally, if you want to unify the quality and sharpness of the entire photo, use “Increase Resolution”.
This way, you have full control over the entire process and can fine-tune the photo to perfection.
How long does it take to process photo expansion?
The entire process is very fast. Generating new edges usually takes only 15 to 30 seconds. The exact time depends on the original image size and the degree of expansion, but it is always a fraction of the time you would spend on manual attempts in other editors.
What if the AI generates something I don’t like?
That can happen – AI is a creative tool. If you are not satisfied with the result, you have two options. Go back a step and try again with a more precise scene description: even a small change (e.g., adding the word “minimalist background”) can lead to a completely different result. If the problem is only in a small part of the image, easily correct the imperfection with the “Edit Image” tool.
Can I expand the photo in only one direction (e.g., only upwards)?
The tools are designed for symmetrical expansion to maintain central composition. However, if you need to add space in only one direction, there’s a simple trick:
- Use “Expand Image” (e.g., Zoom out 1.5×) – the photo will expand symmetrically on all sides.
- Then crop the result in the editor so that the added space remains only where you need it.